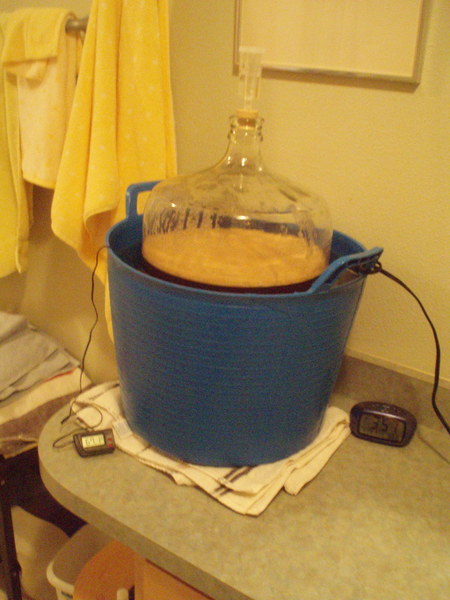
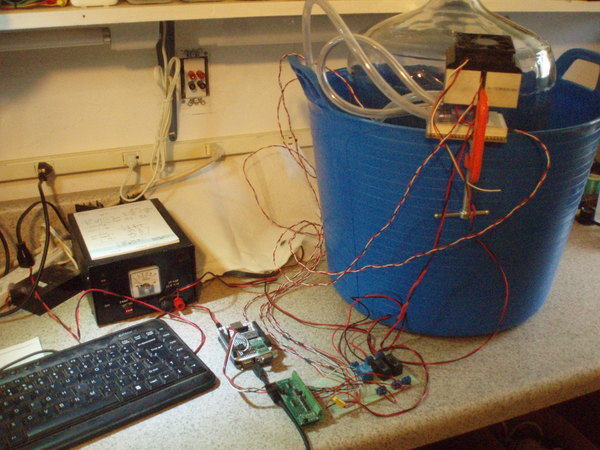
In CCII_36, I mentioned using the DACS to control the temperature of fermenting beer. Well since then I have been pretty busy doing everything except making beer or doing DACS projects. I had some serious medical issues that are over now, and so it is time to get started again on explaining how to control temperature of beer. Let me explain why I want to control and need to make sure my fermenting beer stays within a given temperature range. It is all about the yeast. Typically beer yeast when put into a fermenter, needs that liquid to stay around 68 degrees F or 20 C to work. Now there is some room to play temperature wise, typically plus or minus 3 to 5 degrees, but a constant temperature helps control the fermenting and prevent undue flavors or problems from creeping in. I currently use a fish tank heater to keep a tub of water at 68F and thus the beer where I want it. This works fine as long as the room temperature stays low enough. unfortunately, our summers are too warm and thus I typically stop brewing during the hot days. Here is a picture of a batch of beer and notice the yeast head in the fermenter. The blue plastic bucket holds water and a aquarium heater set to 68 degrees ( brewing in progress ) and leaves room to add bottles of frozen water to cool it down.
If you look at any of the beer magazines, I like "Brew Your Own" magazine, you will see plenty of adds for fancy systems or articles on converting old refrigerators to the task. A recent product uses similar devices as I do with the DACS, but it cost $299 and is out of my budget range. Consider as well that I have plenty of old computers sitting around, not to mention all sorts of parts and it seems building my own version is appropriate. I as well feel this is a good project for showing how the DACS can be used, some perl scripting, and the good and bad points of all that went into the project. It all works, I am just not sure how cost effective, even if the parts are all on hand. More about that after I explain how it all works.
At the bottom of the page is a link to the PDF of the device I used. It is called a "thermoelectric cooler", although there are plenty of other official names used to describe the devices. Basically, you run current one way through the device and one side gets cold, the other hot. Run current the other way thru it and the hot and cold swap sides. You can also generate power from it, by heating the device. They are not a very efficient device, but they do work and they have no moving parts. If used properly, these devices should last almost for ever. I got mine at Fry's and it cost about $15 for a 6A device, while the smaller 3A device is about $12. Supposedly there are larger 12A units.
I haven't seen any advertised for a long time, but you could get small car refrigerators using these devices. The design typically has a heat sink on both sides, a fan to move air thru the heat sinks and depending on your use, current in one direct to cool the contents, or swap directions and heat your lunch. This works well at keeping something cold or warm, but has a bit of an issue moving the temperature a large amount in either direction. I personally believe this is why the units have never been much of a success - too limited abilities.
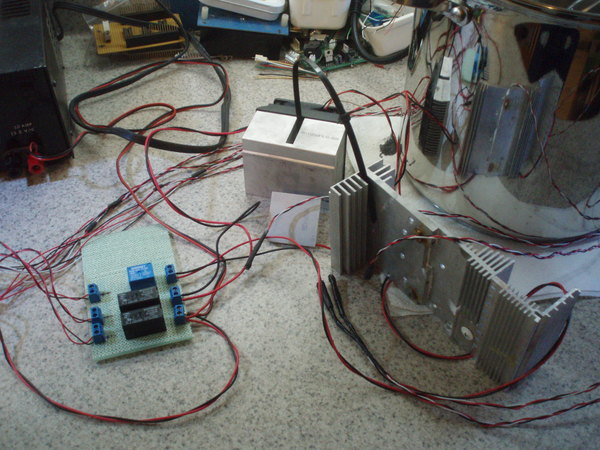
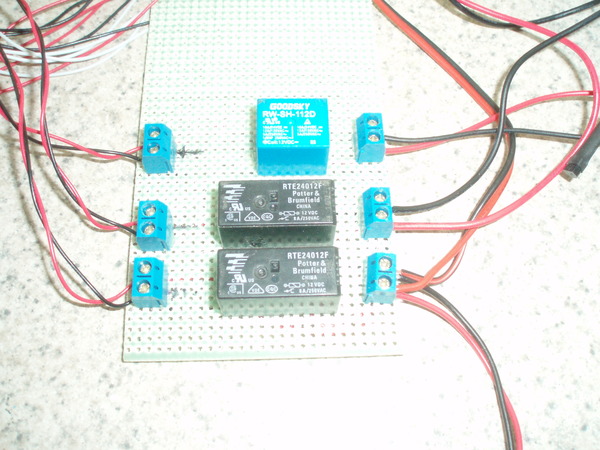
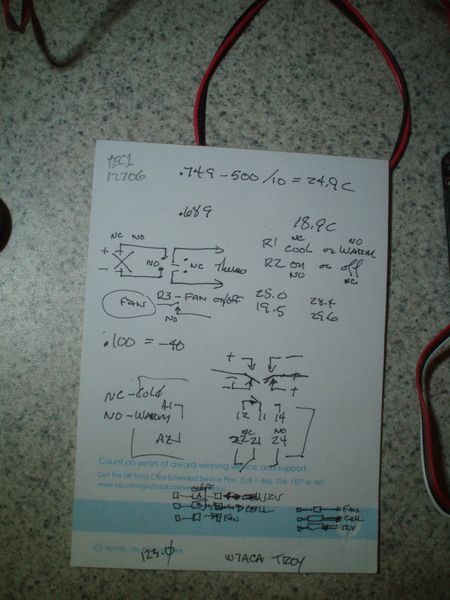
I started with a simple design of both the controller and heat sinks. I built a simple board with some relays and terminals for connecting wires to the power source and the TC or Thermal Cooler. I also built up several, six, temperature sensors to know what temperature the water was at. For the TC, I grabbed several salvaged heat sinks to put on both sides, one an old CPU sink with fan, and the other a bunch of heat sink pieces to sit down in the liquid - all shown here , including the TC. A bit funky, but for testing should do the trick. Here is the board and a temp probe , the probe is the small black unit on the right. I use "tmp36" sensors with all the power signals connected to pin 1 of the DACS, or +5V. Each probe goes to one of the DACS input or voltage measuring inputs. I put heat shrink tubing over units to keep the water out with varying degrees of success. The board is pretty simple, as shown here in this hand drawn layout. Note the conversion for temp probe values to temp C. There are sold state motor controllers that will do the same as my relays, I am just too cheap and thus use relays.
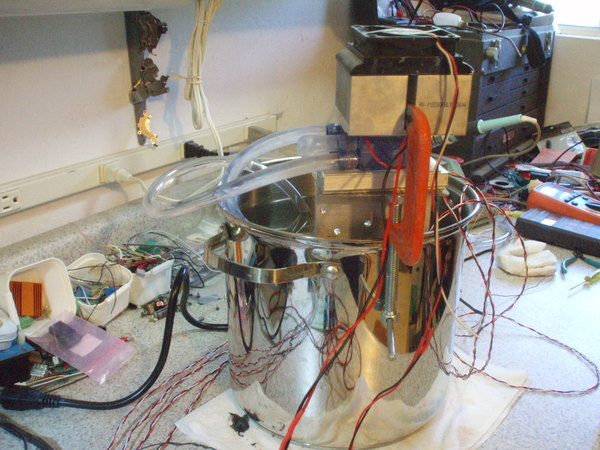
I ran a number of tests just to see if it all worked and discovered my initial power supply was way too under-rated for the task. I needed 12V at 10 or more. I ended up using on old Ham Radio power supply that could do more than the needed 10Amps. That also said my early relays were as well under-rated and needed to be beefier. I was going to control the fan, but decided it just needed to run when ever it was on. I found that few of my temperature sensors waterproofing was not as waterproof as I had intended and so they got dropped out. In the scheme of things all of this go-no-go sort of testing is typical and to be expected. It is all shown here and you can see the pot holding the test water. It worked but not very well, as I suspected the heat transfer was too poor and needed a better way to pull heat/cool out of the water.
I found when looking for other items, some CPU heat sinks for use with water. They were about $3 each and so I bought 4 to try with something like this. The idea is to use an old water bubbler - you know those small bowls with a stream of water rising over rocks to give you some relaxation. You should be able to find them at almost any garage sale, as they didn't relax and certainly were not worth the time or money. However the pumps are small and slow, as well as running at 12V, ideal for our use. I tried using one heat sink and the pump as shown here. I had several problems, all minor, but decided two would be better. I decided to monitor the temperature on water in, water out, fan side of heat sink, and support side of the unit. The probes suggest not enough heat was being removed and thus another sink was needed.
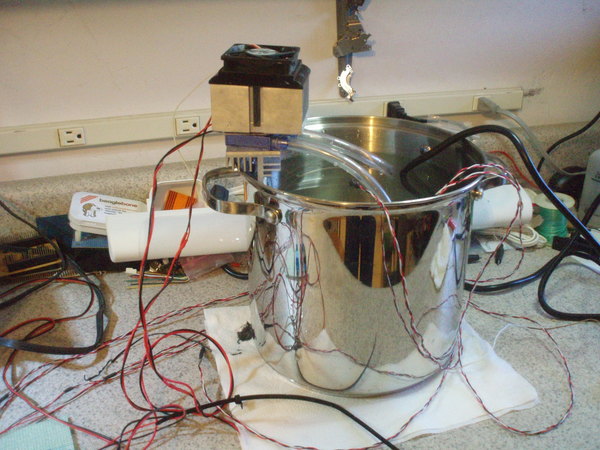
I then tried using two sinks, having one feed the other, but had issues with hooking it all together. I took a "C" clamp and ground it down a little to fit in the fan heat sink and hold all this together. Before the "C" clamp, everything just moved too much and the contact, although coated with heat sink compound, just seemed to be flaky. Testing proved it worked much better, but it now started to take on a big mess of tubes and wires, as shown in this picture.
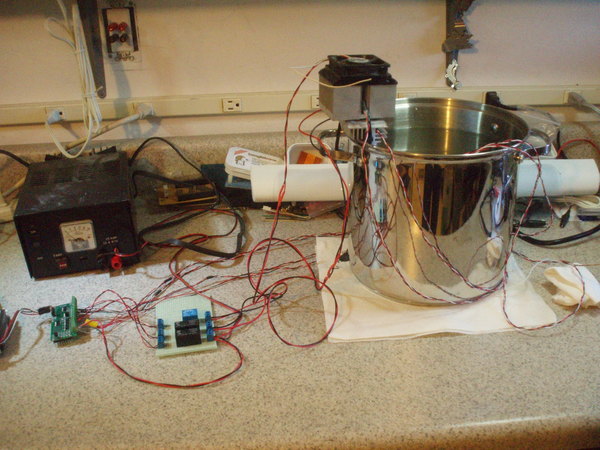
I did some testing and played with it as I will cover next, but it still didn't move the temperature around very much and certainly not very fast. I did one test, as shown here, with how it would be done using a fermenter and the plastic bucket they sit in. This is the same set up I normally use, but with the temperature unit added. It also shows all the units and everything that would move from my lab to the bathroom counter. Needless to say, it is much more complex and way too many items to come loose or break, than what I do now, just an aquarium heater.
If you don't mind all the wires and tubes, the setup as shown above, did work and could do the job with the right software. To test is pretty simple, I connected a BeagleBoneBlack to the DACS and ran most test from the command line as reproduced here:
[ get the help screen to remind us of the commands ]
> ./get_dac.pl /dev/ttyO1 h
h
-------------- DACS Ver. 140523 Commands --------------
DIGITAL INPUTS (n=0 to 5)
i,in        -- show all inputs, input n
DIGITAL OUTPUTS (n=0 to 3)
o,on        -- show all outputs, output n
on+,on-,on~ -- n on, n off, n toggle
o+,o-,o~    -- all on, off, toggle
ANALOG INPUTS (n=0 to 3)
v,vn        -- show all voltages, voltage n
TEMPERATURE
t,tc,tf     -- show C & F, Celsius, Fahrenheit
MISCELLANEOUS
!           -- save configuration to flash
h,hx        -- show help, extended help
r           -- reset processor
s           -- (status) show all I/O
dat         -- show system data
NOTES:
1. Value order is 0,1,2,3,4,5,6
2. 0=off or low, 1=on or high
3. Counts in decimal (nnnnn) & Hex ($nnnn)
4. dat format: |ser.|ver.|res.|logic|ascale|zcount|

[ get date and time to see how long it took ]
> date
Sat Mar 18 16:03:03 PDT 2017

[ get temp values and I/O status ]
> ./get_dac.pl /dev/tty01 s
s | 1 1 1 1 1 1 | 0 0 0 0 | 0.703 0.706 0.680 0.677 | 22.6 72.5 |

[ cold or hot - o0+ is cold ]
> ./get_dac.pl /dev/ttyO1 o0+
o0+

[ see if it is on or not - it is ]
> ./get_dac.pl /dev/ttyO1 s
s  | 1 1 1 1 1 1 | 1 0 0 0 | 0.682 0.683 0.684 0.677 | 19.8 67.4 |

[ turn on the heat sink fan and water pump ]
> ./get_dac.pl /dev/ttyO1 o2+
o2+

[ is it on - yes ]
> ./get_dac.pl /dev/ttyO1 s
s  | 1 1 1 1 1 1 | 1 0 1 0 | 0.682 0.683 0.684 0.677 | 19.7 67.4 |

[ turn on the TC to start cooling ]
> ./get_dac.pl /dev/ttyO1 o1+
o1+

[ check that all three outputs are on ]
> ./get_dac.pl /dev/ttyO1 s
s  | 1 1 1 1 1 1 | 1 1 1 0 | 0.684 0.683 0.684 0.677 | 19.8 67.7 |

[ get date and time of cooling start ]
> date
Sat Mar 18 16:07:09 PDT 2017

[ start checking temp changes and time ]
> ./get_dac.pl /dev/ttyO1 s
s  | 1 1 1 1 1 1 | 1 1 1 0 | 0.683 0.682 0.688 0.677 | 19.8 67.4 |

> date
Sat Mar 18 16:12:09 PDT 2017

[ next check returns... ]
> ./get_dac.pl /dev/ttyO1 s
s  | 1 1 1 1 1 1 | 1 1 1 0 | 0.682 0.680 0.690 0.677 | 19.8 67.4 |

> date
Sat Mar 18 16:17:19 PDT 2017

> ./get_dac.pl /dev/ttyO1 s
s  | 1 1 1 1 1 1 | 1 1 1 0 | 0.681 0.678 0.819 0.677 | 19.8 67.4 |

> date
Sat Mar 18 16:22:17 PDT 2017

> ./get_dac.pl /dev/ttyO1 s
s  | 1 1 1 1 1 1 | 1 1 1 0 | 0.680 0.675 0.822 0.677 | 19.8 67.4 |

> date
Sat Mar 18 16:27:38 PDT 2017

[ and do this till test is done... ]
I used the "get_dac.pl" from ccii_36 article and manually turned on and off various I/O and reading my temperature probes to track changes. A pretty easy testing structure as shown above. I did this several times, moved things around, did longer runs, and basically checked how it was working. The values shown are a mix of real values from different runs and are not to be used seriously. However I did see the temps go up and down with it all running, just not much. I as well saw changes due to slight variations in how the hoses were placed, sensor locations, and just about anything you can think of that might alter the results. I did prove the idea is solid, just a lot more engineering is needed to make it marketable. One example is simply the use of the "C" clamp and CPU heat sinks. I would guess you need to make a special machined block instead of the CPU heat sinks. If I wanted to do one just for the fun of it, my overall design works and could be used.
I said I would give you a perl program to keep the temperature in check and I ruffed out a simple beer.pl program. It shows the basic ideas and some smple code. It is by no means a true program as such, but gets the idea accross using a few really simple solutions. Take the sensor readings which I use as actual read values to set the range of temperatures we want - no conversion steps. That makes the overall design considerably simpler, but means changing the hard coded values when you want a different range to be maintained.
So here is beer.pl:
#!/usr/bin/perl
#
# util to keep fermenting beer at fixed temp
# > ./beer.pl /dev/ttyUSB0
#
# may need to do "sudo apt-get install libdevice-serialport-perl"
use Device::SerialPort;

# get device dir to use
($device, $other) = @ARGV;
if($device eq "") {
  print "usage: beer.pl device ( /dev/tty??? for dac )\n";
  exit(0);
}

# setup facts...
# temp1 is v0 and probe sits at/near bottom of water
# temp2 is v1 and probe is attached to cold heat sink
# temp3 is v2 and probe is attached to hot heat sink
# temp4 is v3 and probe is sitting by the area - room temp
#
# relay1 is o0 and controls cold/hot polarity - feeds relay2
# relay2 is o1 and controls power to thermal device off/on
# relay3 is o2 and controls heat sink fan off/on
#
# variables - global
# tmp36 sensor, 25c is 0750 or 10mv/1c - offset of 500
# set points of returned values we test for
# adjust values for each sensors calibration....
#
# to calibrate - get all probes at same temp - ideally 20c
# and then put probe values as stemp? and adjust all other
# values up or down from the stemp? values...
#
# set the desired value, target values to reach
# for ale 20c
$stemp1="0691";
$stemp2="0692";
$stemp3="0693";
$stemp4="0687";
# hi value to not exceed...
# 2c above stemp
$htemp1="0693";
$htemp2="0694";
$htemp3="0695";
$htemp4="0689";
# low value not to go below...
# 2c below stemp
$ltemp1="0689";
$ltemp2="0690";
$ltemp3="0691";
$ltemp4="0685";
# values returned from sensors
$vtemp1="";
$vtemp2="";
$vtemp3="";
$vtemp4="";

####### start processing run ###########
# get start time of run
$date = `date +'%Y-%m-%d|%H:%M:%S'`;
chomp $date;
print "$date|";

my $port = Device::SerialPort->new("$device");
$port->user_msg(ON);
$port->databits(8);
$port->baudrate(19200);
$port->parity("none");
$port->stopbits(1);
$port->handshake("none");
$port->write_settings;

# needed to clear buffer
$port->lookclear;

# do send command - get  digitial in
$port->write("v\n");
# get results and print it
get_val () ;

print "$vtemp1|$vtemp2|$vtemp3|$vtemp4|";

# check for turning cooling fan on
# is temp3 not same as room temp?
# being on almost always is not a bad thing...
if ( $vtemp3 ne $vtemp4 ) {
       $port->write("o2+\n");
       drop_echo () ;
       $relay3 = "fan on "
       } else {
       $port->write("o2-\n");
       drop_echo () ;
       $relay3 = "fan off"
       }
print "$relay3|" ;

# check for turning thermal to cold or hot
# is temp higher than setpoint
# relay off is cooling
if ( $vtemp1 ge $stemp1 ) {
       $port->write("o0-\n");
       drop_echo () ;
       $relay1 = "cool"
       } else {
       $port->write("o0+\n");
       drop_echo () ;
       $relay1 = "heat"
       }
print "$relay1|" ;

# check for turning device on
# is relay 1 heating or cooling?
if ( $relay1 eq "heat"  &&  $vtemp2 ge $htemp2 ) {
       $port->write("o2+\n");
       drop_echo () ;
       $relay2 = "TC on "
       } else {
       $port->write("o2-\n");
       drop_echo () ;
       $relay2 = "TC off"
       }
if ( $relay1 eq "cool"  &&  $vtemp2 lt $ltemp2 ) {
       $port->write("o2+\n");
       drop_echo () ;
       $relay2 = "TC on "
       } else {
       $port->write("o2-\n");
       drop_echo () ;
       $relay2 = "TC off"
       }

print "$relay2|" ;

print "\n";
$port->close || die "failed to close";
undef $port;
exit;

###### subs ########
sub get_val {
# should be echo char space value
  while(1) {
    my $byte=$port->read(1);
    if ( $byte eq ">") {
       last;
    }
    if ( $byte eq "\r") {
       $byte="";
    }
    if ( $byte eq "\n") {
       $byte="";
    }
    if ( $byte eq ".") {
       next;
    }
    #print "$byte";
    $value="$value$byte";
  }
  ($echo, $vtemp1, $vtemp2, $vtemp3, $vtemp4, $junk) = split(/ /, $value);
}

sub drop_echo {
# read till > and toss it all...
# should be echo char space value
  while(1) {
    my $byte=$port->read(1);
    if ( $byte eq ">") {
       last;
    }
  }
}
My test setup is no longer "up", but I did check that the program works without any failures as such. However, your setup most likely would be different than mine, especially which and where the temp sensors are located. I have my TC on/off relay default to off for being off, but the hot vs cold default is also off. If you make yours different than mine or use some other device, the code would need to be changed. So, yes it works, but how well and if for you is the question.
How would I use the beer.pl, as a crontab script. It is written with the idea that you would call the utility say once every ten or fifteen minutes. It would then decide to heat or cool if needed, or do nothing. The reason is that the 5 gallons of fermenting beer and 2 gallons of water jacket make a considerable amount of mass and thus are very slow in changing the overall temperature. Consider as well, that the TC isn't a major source of heating or cooling, but something that will put or pull BTU's over an extended period of time. "beer.pl" is also designed to stop doing anything when your within 2 degrees of the ideal brew temp. In other words, you have plenty of room to let the real temp vary and thus getting "good enough" works just fine.
This project was primarily to show how using the BOBZ DACS and the plain text interface can make a project very simple to do. The fact that my use was keeping the fermenter at the right temperature was just an example use. Could it become a commercial product, only with considerable engineering and testing. Would I do it the way shown, probably not - the hoses are a big issue for me. Did I hit my goal of showing you how, yes, but it took over two years. The biggest problem using the TC's is their need for lots of current. If you use them as designed, you will need about 150Watt from a 12V supply, a bit much for use in my spare bathroom where I ferment my beer.
I have included the files used for you to download and play with - have fun! I hope you find this article helpful and gets you thinking about your beer brewing and use of devices. I talked Bob into doing the plain text interface and hope from this you can see why I wanted it. Everything from testing through final program was just so much easier with plain text and required fewer lines of code. For your next project, consider plain text interfaces.
The TEC1 pdf file
The basic perl script get_dacs.pl
The perl script beer.pl